
Admin Control Panel

Posts Change Layout Sign Out
Showing posts with label Project Life. Show all posts

Oct 13, 2014

SC Inspires Blog Hop

Welcome to the Studio Calico Inspires blog hop!  Today I wanted to take a minute and share with you how SC inspires me.  I also just *might* have an awesome giveaway at the end of this post!

As some of you know, I'm part of the Studio Calico Creative Team.  Specifically, I'm on the Card Team, but my love for SC products don't stop there.  I actually subscribe to the Project Life kits & have for quite some time.  They coordinate perfectly with the Card Kits & allow me to really stretch my supplies and create some fun projects each month.
I would consider myself a "dabbler."  Although I love making cards, I also really enjoy crafting in all aspects.  I love making home decor pieces, gifts, wearable art, etc. out of papercrafting/scrapbooking supplies.  And, although I'm not a traditional (weekly) "Project Lifer", I love using pocket pages to document trips, events, & everyday life with my family.

The Project Life kit is perfect for someone like me because with this kit, you can do it all!  The journaling cards work really well as focal points on greeting cards.  The PL kits also always come with amazing embellishments.  The copper rub-ons in October's kit were just the thing to dress up the bottom of this card.
Sometimes the cards are so amazing that I just pull them from my kits & hang them on my fridge or in my craft room for inspiration.  I found this tiny frame at the dollar store & added one of the 3x4 cards from the Underground PL kit to it.  Voila!  Instant home decor! (Isn't that printed masking tape pure PERFECTION?!?  I want to use it on everything!)
The thing I love most about Studio Calico is that they are always pushing the boundaries to create new & innovative products.  That's what inspires me like none other.  And, I've found that having fresh products each month really helps the creativity flow.

I filled this little jar with fall scented potpourri & applied one of the rub-ons from the PL kit to the front.  And... of course, I can't put that masking tape down.  It's just perfect for everything!
And now... are you ready for some fun?  Let's start with this FREE PRINTABLE that's available for download right now!  Click Here to get yours!

But wait... there's more!
http://www.studiocalico.com/digital/free/fall-printable-poster?aff=7ded1832 
Studio Calico is giving away over $1,400 in prizes!  Everyone who downloads this printable automatically gets their name put in the “hat” & all of the prizes will be drawn from this list.

Please use the hashtag: #scinspires to talk about how SC inspires you on your social media platforms.

The prizes get bigger & bigger with each use of the hashtag.
 

Check the SC blog each Friday to get an update on how many #scinspires shares have been posted.
I'm giving away the Underground Project Life kit to one of you!  To be eligible to win, please leave a comment telling me what your favorite season is.  I'll chose a winner on Saturday, October 25th.  Good luck!  (And don't forget to download your printable & spread the word about #scinspires)

To see the full list of blog hop participants (and for your chance to win even more giveaways), be sure to check out this post at Studio Calico.

Jul 2, 2014

Project Life® Bits & Baubles Box + Free Download!

I subscribe to Studio Calico's Project Life® kits, so each month a beautifully curated box of craft supplies arrives at my doorstep.  Of course, the box contents are crazy amazing, but the box makes my heart go pitter patter all by itself!

It's extremely well made, sturdy, and has a strong magnetic closure.  It's just too perfect to throw away!  I've re-purposed them in a variety of ways.  I've turned them into travel kits, greeting card gift sets, first aid kits, recipe boxes, paper doll sets & more.

But today, I wanted to show you how perfect they are for organizing all those little bits & baubles that you collect.  I'll share a free cut file that you can download to create dividers for the inside of the box.   I've used this box to organize some of my smaller kit supplies, but I think it would make a great jewelery box too.

This is what a Project Life® box looks like.
 
I've covered it with patterned paper in the past, but I decided to spray paint it this time & I loved the results!  (I prefer Valspar's flat paint/primer in one.)
 Now you've got a blank slate to work with & you can decorate the box or leave it as is.

I covered my box with some of my favorite paper of all time.  (Studio Calico's Color Theory pack.)  It comes with the little faux paper strips already printed on the paper, making a perfect spot to add my text.
 I used another sheet of Color Theory paper along with my Silhouette to create the dividers for the inside of the box.  (You can download the files here.)

The file will automatically cut your score lines, so you'll just need to make mountain & valley folds to create each section.  Please let me know if you have any trouble figuring out how it goes together.
 ... and there you have it!

I hope you enjoy creating your own bits & baubles box!  Enjoy!

Jul 1, 2014

DIY Project Life® Sorage Tin

I love re-purposing things.  I started (probably out of necessity) as a little girl & it still gives me warm fuzzies to this day. 
 Have you seen these organizers from Land of Nod?  I've always thought they were really cute & they were the inspiration for this DIY project.

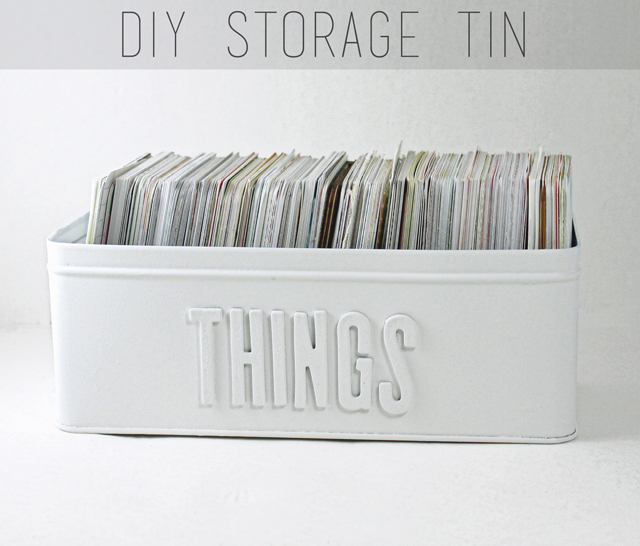
I'm a newly converted tea drinker & went through this tea tin quickly this winter.  I loved the shape of it though & decided to hold onto it just in case I could use it for something later.  I'm glad I did, because it ended up transforming into a perfect storage tin for my craft space!
 To begin with, I used a flat spray paint/primer-in-one to cover the tin & paint it white.  Valspar is my favorite brand, but Krylon works really well too.

I loved the scale of these alphabet stickers from a previous Studio Calico kit & applied them directly to the tin.
 Once my letters were in place, I applied a couple additional coats of paints & voila!
The tin is the perfect size for holding 3x4" Project Life® cards... but of course, could be used to hold any of your things.  (Hence the name.)

I have a new obsession with spray paint.  It's seriously the Duct Tape for crafters!

May 28, 2014

New Kit Love

Have you checked out the June {Hello, Hello} kits from Studio Calico?  They're available now & I am in love.  Seriously.  I've talked about the card kits in my previous posts, but I feel that it's my duty to show you the amazing goodness that's in the other kits.  :)

Sometimes you just need a diagram.  So here are some of the reasons I love the Hello, Hello Scrapbook kit:

Who else is excited about the comeback of foam stamps?!?  I love it when I know I will use each and every piece in a kit.  That's when you know it's a winner.

And this is the Hello, Hello Project Life kit for this month.  The cards themselves are so colorful & fun!  Here are some of the other features that I love:
I can't wait for my box of new goodies to arrive!

May 13, 2014

Letterpress Recipe Card Tutorial

As I mentioned yesterday, my letterpress supplies have been getting a workout lately.  I LOVE letterpressing from home.  It's so simple & the results are so instantly gratifying.  :)  I can't wait to learn even more in the upcoming online Letterpress Class from Studio Calico.

The new kitchen themed letterpress plates (Recipe Card & From the Kitchen Of) make it easy to create handmade gifts. In this tutorial, I’ll show you how to create a set of letterpressed recipe cards that look like they came from an expensive boutique! I’ll also show you how you can repurpose your Project Life packaging to create a recipe box.
I packaged up a set of letterpress cards along with a simple tea towel & tied them together with twine.

I hope you give letterpress a try!  It's so much fun. 

Jan 18, 2014

Sharing My Project Life Album Cover & Title Page

I'm really excited about jumping in to Project Life this year.  I've dabbled in it a bit in the past, but never really figured out a system that worked well for me… until now.

I didn't want to start another 12x12 album.  I tried that in the past & the project just overwhelmed me.  I wanted to work with something a little smaller, but still be able to fit my boys' 8-1/2x11 school papers, drawings, etc. - so the Handbook system seemed a little too small.

Recently I visited Marcy Penner's blog where she shared her vision for a mid-sized Project Life album. You can read all about how she created a 9x12 album by cutting down a full sized Modern Album from American Crafts.  It was like a weight had been lifted off of me.  (I know this sounds a little silly, but I was getting frustrated with trying to figure out a way to document this next year & I was itching to get started.)
I just so happened to have one of these albums on hand, so I went to work trimming the album down to size.  I wanted to cover the raw chipboard that remained with something durable & easy to keep clean… and I'm excited about the solution I found.

Spoonflower is a great site where designers can sell their work as fabric, decals, gift wrap & wallpaper. When I saw that wallpaper was an option, I knew I had found my cover!  You can purchase a 24"x12" swatch of any design for only $5!  The wallpaper is pre pasted, so you just have to follow the application directions & place it over your album cover just as if it were a wall.  (The print I chose was really basic & I was able to use just one swatch & piece the back cover.  If you chose a pattern with a more intricate design, I would suggest purchasing 2 swatches.)

Here is the swatch that I ordered: Grey Linen Speckled

I wrapped the wallpaper over the edges of my album & taped the ends to secure them even more.  (The patterned paper adhered to the inside covers any imperfections.)

My album feels very sturdy & can even be wiped clean if needed.
I wanted to dress up my cover a bit & found a letterman jacket monogram letter on Ebay & adhered it with hot glue.
Now onto the inside of my album…
 I love this paper designed by Shanna Noel for Studio Calico.  It's from their Printshop collection 6x6 pad.  I thought it summarized what this album is all about.  I added a little cut out that I created with my Silhouette to frame it out.

And here is my title page for this year.  It was really easy to just trim 3" off of the page protector to create the 9x12 size that I needed.  No stitching/gluing required!
 I subscribe to the Studio Calico Project Life kits & love, love, love them!  There is always a fun mix of trendy PL cards, embellishments & stamps included.  It makes this project much less daunting.
I love this heart/text card from the Copper Mountain PL kit.  I just adhered wood veneer right over the top of the page protector.  The aztec print card above is also from the same kit.
I've been hoarding this ampersand clip for months & finally found a good home for it.  I don't think I'll ever get tired of wood veneer either.
I couldn't forget our "3rd child" (aka Moses), our Boston Terrier.  I used a lot of the chipboard from one of the SC Project Life add-ons on this page.
This card is another piece of the Printshop collection.  (from the Journaling Card set) I love the words & I added my own message with letter stickers on the side.
I applied these Printshop rub-ons directly over the page protector.
I love the swiss cross/plus sign trend right now & found this vintage red cross pin on Ebay:
Here's a peek at what my first page for January looks like, as well as the back cover.  I put some of my favorite cards in & am now ready to quickly finish out the page.
My plan is to document a month at a time.  I know I wouldn't keep up with going the weekly route & wanted to set myself up for success.  Some months might have weekly spreads & some might have one spread for the full month.  I'm planning on being very eclectic with my page sizes as well.  If it fits in the album, it's fair game.  Here's a link to a variety of page protectors that could work in this type of album.

Thank you so much for taking a peek at the beginnings of my PL 2014 album!  I hope to have many more pages to share with you over the year.  :)

Dec 22, 2013

Are You Interested In Doing Project Life in 2014

With the new year quickly approaching, now is a great time to take the plunge & begin Project Life®.  That's my plan, at least. :)  I've been trying to talk myself into starting mid-year, but the OCD part of me just wanted to start on January 1st.

Project Life® is a memory keeping system that helps you document the everyday.  You can do it weekly, monthly, or any other configuration that works well with your life.  You just add pictures & journaling to pocket pages… adding in ephemera & other things to help tell your story.

One thing that I think is going to be a HUGE help in making this project a success for me is this new class from Studio Calico called Day by Day.


The Day by Day class is packed with resources!  You get videos, tips, tutorials, downloads & more all from a group of talented PL pros.  The great thing is, this class doesn't end at the last of the month like other classes.  There will be continued information & support throughout the entire year!!!

Sign ups are going on now through the end of December & class begins on January 1st, 2014.  If you register now, you'll also get the FREE stamp set that you see above (while supplies last!)  You'll also get instant access to digital files & printables that are exclusive to the class.

Plus… if you do sign up now, there are some great promo codes available for class members that you can use now as well:


It's also a great time to sign up for a Project Life® monthly subscription!

Sign up for a 6 month subscription and receive a free stamp grab bag (three different promo codes, one per kit: PLSTAMPGRAB, CARDSTAMPGRAB, SBSTAMPGRAB) 

Aug 7, 2013

A Sale, A Card, & other Scrappy News!

Hello, hello!  I'm popping in to share a few fun things with you today.
First of all, there is an awesome sale going on at Two Peas right now!
 The entire store is on sale, including workshops!  If you've been on the fence about signing up for my Journey Into Card Making workshop, now is a great time.  The online, self-paced class is only $9.60 this week!

There's also a new scrapbooking workshop available now by Jill Sprott called Scrapbooking from the Soul.  I just signed up myself!  Jill is AMAZING & this is a topic that I'm super excited about.  (Jill's class is only $9.60 this week too!)

I also picked up a few other things from the Two Peas sale.

This vintage grab bag looks perfect for documenting the upcoming school year!

I also picked up this new exclusive stamp set designed by Shimelle Laine for Two Peas.  It's perfect for my not-so-perfect life.  :)

I was excited today because my new Big Shot die cutter arrived today.  I had a Cuttlebug, but I *might* have broken it by trying to emboss things that have no business being embossed.  (Note to self:  wood veneer does not make a good impression in cardstock, no matter how hard you try to crank the knob of the die cutter.)

I needed a die cutter to to work with the new Letterpress tools that are coming from Studio Calico.  Have you seen the latest class?  Sign ups are going on now & you can find all of the exclusive plates + other tools here.

So, now that I have a functioning die cutter, I can finally use those cool metal dies from Lawn Fawn that I've been drooling over.  The dies match up perfectly with their stamps, making card making a cinch!  P.S. They're on sale at Two Peas this week too!
One of my favorite stamp sets right now from Lawn Fawn is their Critters in the Dog Park set.  There's a dog that looks similar to a French Bulldog in the set... but after I added a few extra lines & colored it in, it looked just like our Boston Terrier!  My son flipped.  He loves anything that resembles his best four-legged friend.

I used the Quinn's ABCs stamp/die combo for the sentiment.  Easy peasy!
The dog paws are also from the Critters set.  I just stamped them with Versamark & it worked perfectly with the black cardstock.

The heart 3x4 card & paper are from this month's Marks & Co kits from Studio Calico.  I used the exclusive stitching template in the Main Scrapbooking kit as a guide for hand-stitching the 3x4 card.

Thanks for taking a peek at my project & for visiting today!  Hope you have a good one!

This site has been Tweaked and Designed by Sara Williams | Powered by Blogger | Back to Top
 
Pin It button on image hover