Admin Control Panel

Posts Change Layout Sign Out

Aug 31, 2011

A Country Wedding & Bits and Baubles

Hello my blog buddies!  I'm still playing catch-up & have some cards to share that I've recently posted to my Two Peas in a Bucket Gallery.  I had SO much fun making these!  The colors in so many of this season's collections are just so soft and beautiful!
(click on photo for clearer view)


I love this adorable truck from Echo Park & thought it would make the perfect getaway "car" for a country wedding! I loaded the truck bed with flowers & hearts & bits of sparkle. Instead of tin cans, I "tied" flowers onto the bumper using bakers twine.

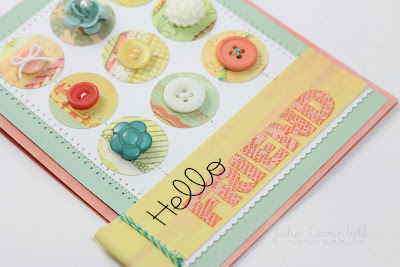
And... here is a card I made for a sweet crafty friend of mine:
I love using rub-ons! They're always so vibrant & are so easy to customize. I used the Studio Calico Weekdays Rub-ons to create the word "Friend" by cutting apart bits and pieces and applying them side-by-side. The rest of the card was really fun to make too! I punched out several circles, added stitching, and then topped them with buttons and other treasures.


Country Wedding Card Supplies: (Click on Pictures for Links)


Hello Friend Card Supplies: (Click on Pictures for Links)


Aug 30, 2011

Paper Crafts "Card Making 101" Blog Hop

Good morning, class!  ;)  If you've been to the Paper Crafts Connection blog, you might have heard that the Go-to Gals have some fun lessons in store for you today!

Hopefully you'll get to learn some new techniques along the way!  I'll be teaching Hand-Stitching Techniques 101, so read on to find out how you can easily add some personalized touches to your paper crafted projects.

Here is a card I made using Bo Bunny's new Garden Girl Collection:


To begin, create a computer-generated sentiment & print it onto vellum.  (Think of this as your pattern piece.)  I like using vellum because it is translucent & allows you to see exactly where your stitching will be in relation to your patterned paper.

It's a little hard to see, but in the picture below, my vellum was placed over a small piece of patterned paper.  I temporarily placed a chipboard frame over the vellum to make sure everything was centered.

Once your vellum is centered, begin piercing holes.  You can either use a paper piercer or a large needle.  While you're piercing, keep in mind that the length between your holes will later be the length of your stitches.


Continue stitching until you've completed your pattern.  Remove the vellum.


I threaded my needle with 3 strands of embroidery floss and knotted one end.  Begin your stitching from the back side of your paper.


Using a back-stitch, follow the pierced pattern that you've created.
How To Make a Back-Stitch

If you need to dot an "i", you can make a French knot.


How To Make a French Knot


And... if you're really brave, why not try out some of these fancy stitches?

I hope you've enjoyed my lesson on hand-stitching!  If you give this lesson a try, please let me know!  I'd love to see your A+ work!  :)

Make sure to check out the PCC Blog as well as the other Go-to Gals classes:


Card Supplies: (Click Pictures For Links)

Aug 29, 2011

Guest Designing for A New Card Kit Club!

Have you heard the news?  Jillibean Soup has a new Kit Club just for card makers!!!  I'm so excited because I get to be a guest designer for their first kit.


This kit is seriously awesome!  (You can find out more about September's kit contents HERE.)  I've made 8 cards with the kit so far & still have enough to make at least double that.  It comes with brand new Jillibean paper, card bases, stickers, & TONS of great embellishments!  Here are a few cards that I've made using only the supplies from the kit:


I'll have more to share soon!  If you're like me & love making cards, make sure to check out the Jillibean Soup Card Kitchen!  :)

This site has been Tweaked and Designed by Sara Williams | Powered by Blogger | Back to Top
 
Pin It button on image hover